Approaches Flashcards
Deltopectoral
Interval: Deltoid (axillary n.) & pec major (med & lat pectoral n.)
- cephalic vein is landmark
Approach: Split deltoid and pec, incise clavipec fascia, come down on subscapularis
Dangers: cephalic vein, axillary n., musculocutaneous n. Biceps tendon, anterior circumflex vessels

Deltoid Split
Interval: none
Approach: Split fibres of deltoid
Dangers: Axillary n.. Crosses humerus approximately 5-7cm distal from tip of acromion

Judet Approach Shoulder
Interval: Teres Minor (Axillary n.) and Infraspinatus (Suprascapular N.)
Approach: Split deltoid or elevate from scapular spine. Fat stripe between teres minor and infraspinatus. Brings you down on capsule.
Dangers: Axillary n & post humeral circunflex a. in quadrilateral space. Suprascapular n. (3cm medial to glenoid at suprascapular notch, and 2cm medial to glenoid at spinoglenoid notch)

Anterolateral Approach Humerus
Interval:
- Proximal: Deltoid (Axillary N.) & Biceps (Musculocutaneous)
- Distal: Brachialis Split (Medial - Median n. lateral- radial N.)
Approach: Incision- coracoid to deltoid tuberosity then along lateral boarder of biceps. Establish deltopecotral interval, and separate between biceps and deltoid. As brachialis emerges, develelop split. Can be extended into a henry approach of the volar forearm.
Dangers: Musculocutaneous N. Deep to biceps, superficial to brachialis. Radial N. Between brachialis and brachioradialis laterally and in spiral groove. LABCN between brachialis and brachioradialis

Paratricipital Approach
Interval: Lateral head of triceps (radial n.) and lateral intramuscular septum
Approach: Either identify LABCN (and trace to radial nerve proper) or radial nerve as it plunges into the intramuscular septum (~10cm proximal to the lateral epicondyle. Once radial nerve proper identified protect, peel triceps off of posterior humerus.
Dangers: Radial N. LABCN
* can do medial or lateral. Medially, radial nerve enters spiral groove ~14cm proximal to medial epicondyle. Ulnar nerve to be identified deep to brachioradialis.

Triceps Splitting Approach
Interval: No internervous plane, split triceps (radial n.)
Approach: Start 8cm distal to tip of acromion (distal to axillary n.). Split between long and lateral heads superficially, and split medial head deep. Care taken to mark out spiral groove and dissect radial nerve.
Dangers: Axillary N. proximally, radial n. in spiral groove.
*thought that this approach can de-innervate medial head of triceps

Olecranon Osteotomy
Interval: n/a
Approach: Apex distal osteotomy ~2cm distal to olecranon tip. Into “bare area” of sigmoid notch. Saw 1/2- 2/3 of the way in, then finish with osteotome to get interdigitation. Can predrill olecranon to give good reduction after. Can extend from a paratriciptal/triceps split.
Dangers: Articular surface distal humerus/ulna.

Boyd Approach
Interval: Between both anconeus (radial n.) and ECU (PIN), and subcutaneous boarder of ulna/ FCU (ulnar n.)
Approach: Develop interval between both anconeus and ECU, and lift both anteriorly. Release supinator subperiosteally.
Dangers: Increased risk of synostosis.
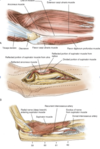
Kocher Approach
Interval: Anconeus (radial n.) & ECU (PIN)
Approach: Look for fat stripe between the two. Anconeus fibres will run obliquely. Will need to elevate some of supinator to reveal distal insertion of LUCL on crestor supinatore.
Dangers: PIN, LUCL
* can extend proximally by detatching anconeus from its origin on the distal humerus, and triceps from lateral intramuscular septum.

EDC Split
Interval: Split EDC Tendon
Approach: It is the “shiny” tendon on the lateral aspect of the elbow. Split 50/50. Gives more access to anterior structures of the elbow (ie coranoid).
Dangers: PIN, LUCL.

Kaplan
Interval: EDC (PIN), ECRL/ECRB (Radial N., PIN)
Approach: Split interval above. Proximal interval of the Thompson approach to the forearm.
Dangers: PIN
*pictured: kocher vs kaplan

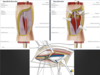
Hotchkiss Medial Over-the-top
Interval:
- Proximally: Intermuscular septum between triceps (radial n.) & brachialis (radial n, median n.)
- Distally: Through flexor pronator mass. FCU (ulnar n.) & FDS/Palmaris Longus (Median n.)
Approach: Unroof, identify and mobilize the ulnar n. Split flexor pronator mass, and elevate anteriorly. Care to be taken for MUCL
Dangers: Ulnar N. MUCL, Median N. Brachial A., MABCN (found on fascia anterior to septum)

FCU Split
Interval: None, between two heads of FCU (Ulnar N.)
Approach: Identify, unroof and protect median n. Split two heads of FCU and elevate anteriorly. Care to be taken not to injure MUCL
Dangers: MUCL, Ulnar N. Median N. Brachial A.

Modified Taylor and Scham
Interval: ECU (PIN), FCU (Ulnar N.)
Approach: Dissect down to subcutaneous boarder of ulan and lift everything anteriorly. Akin to the boyd but on the medial side. Gives access to base of coranoid/sublime tubercle
Dangers: Ulnar N., MUCL
*1 = Hotchkiss, 2= FCU Split, 3=Taylor Scham

Triceps Reflecting Anconeus Pedicle (TRAP)
Interval: Kocher Anconeus (radial n.), ECU (PIN) distally, triceps peel proximally
Approach: Establish the Kocher interval, then proceed to release the ulnar insertion of anconeus, while maintaining its fascial connection to triceps. Can then elevate the triceps off the olecranon.
Dangers: Radial N. PIN, LUCL
* Thought to preserve innervation to Anconeus

Bryan-Morrey Triceps Reflecting
Interval:
- Proximally Triceps (radial n.) & lateral intramuscular septum.
- Distally- Kocher: anconeus (radial n) & ECU (PIN). keeping fascial connection between Anconeus and triceps.
Approach: Identify, expose and protect ulnar n. elevate triceps from intramuscular septum and off of olecranon. Distally the flap is based on the attachment of the anconeus. Keep attachement between triceps and anconeus.
Dangers: Ulnar N. Radial N. proximally and laterally. LUCL

Approach to Ulnar Shaft
Interval: ECU (PIN), FCU (Ulnar N.)
Approach: Dissect onto subcutaneous boarder of ulna. Lift ECU and FCU subperiosteally to expose.
Dangers: Ulnar N (under FCU, ontop of FDP), Dorsal cutaneous branch of ulna distally, Ulnar A (runs with Ulnar N, radial to ulnar N)

Henry Approach Volar Forearm
Interval:
- Superficial
- Proximally brachioradialis (radial n.) & pronator teres (median n.)
- Distally brachioradialis (radial n.) & radial a.
- Deep
- Proximal to distal: supinator, FDS, FDP, Pronator Quadratus
Approach: Landmark incision from lateral aspect of biceps tendon to radial styloid. Proximally develop interval between biceps and brachioradialis down to radial tuberosity. Can then elevate supinator subperiosteally. Distally will have to release insertion of PT. Care to be taken to ligate/cauterize multiple perforators from radial artery.
Dangers:
- Superficial radial N. (Deep to brachioradialis)
- PIN - radial neck under supinator
- Radial A. - under BR
*FCR approach, the interval is between FCR and radial artery (radial artery goes radially). In Henry, the radial artery comes medially.

Thompson Approach Dorsal Forearm
Interval:
- Superficial: EDC (PIN), ECRL/ECRB (Radial n., PIN)
- Deep: Supinator (PIN) and Pronator Teres (median n.)
Approach: Distal extent of Kaplan at the elbow. Need to indenfity, expose and protect PIN as it leaves supinator and all of its branches. Retract posteriorly. Develop between Supinator and PT proximally.
Dangers:

FCR Approach to the Distal Radius
Interval: FCR (Median N.) and Radial a. (brachioradialis- radial n.)
Approach:
- Sharp incision over FCR tendon, sharply through skin, subcutaenous tissue and FCR sheath. Retract FCR tendon radially and incise through FCR subsheath.
- Retract FPL tendon ulnarly
- Incise PQ along distal and radial boarder and peel off subperiosteally to reveal distal radius
Dangers: Radial A., Median N.

Volar Ulnar Approach at the Wrist
Interval: Flexor Tendons [(FDS) - Median N.)] & Ulnar A.
Approach: Develop interval between FDS and FCU. Work proximally to identify ulnar a. and ulnar n. Develop interval between ulnar a. and flexor tendons. Identify PQ, lift PQ radially to reveal ulnar aspect of distal radius. Can follow ulnar n. and relase guyons canal, can release carpal tunnel through this approach as well.
Dangers: Ulnar A. Ulnar N.

Dorsal Approach to the Wrist
Interval: 3rd & 4th extensor compartments (both PIN).
Approach:
- Incision centered over Lister’s tubercle
- Elevate skin flap, excise extensor retinaculum.
- Identify 3rd and 4th compartment and split the two.
- Identify dorsal wrist capsule, dorsal intercarpal ligament, and dorsal radiocarpal ligament. (Ligament sparing capsulotomy)
Dangers: PIN purely sensory at the wrist (can be ablated for pain control). SL, LT ligaments.

Russe Approach (Volar Approach to Scaphoid)
Interval: Radial a. and FCR (Median N.)
Approach:
- Incision centred over the scaphoid tubercle
- Identify FCR tendon, then cut through subsheath like in FCR.
- Split thenar muscles distally
- Incise capsule over scaphoid and expose scaphoid up to ST joint
Dangers: Radial A.

Posterior Approach to the Femur
Interval: Lateral Intermuscular Septum & Biceps Femoris (Tibial Branch of Sciatic N.)
Approach:
- Midline incision over posterior femur.
- Find septum, retract biceps laterally to expose sciatic N.
- Incise the short head of biceps femoris at the linea aspera, and retract it laterally to protect Sciatic N. and expose femur.
Dangers:
- Sciatic N
- N. to biceps femoris
- Posterior Femoral Cutaneous N. (PFCN)
(#4 on diagram)

Subvastus/Lateral Approach to Femur
Interval: Lateral Intramuscular Septum & Vastus Lateralis (femoral n.). Technically none.
Approach:
- Incise IT Band
- Incise Vastus Lateralis fascia.
- Lift Vastus lateralis from septum and femur, taking care to cauterize perforator branches.
- Can go either through vastus (direct lateral) or under vastus (posterolateral)
Dangers: Perforating branches of Profunda Femoral A.

Anteromedial Approach to the Distal Femur
Interval: Vastus Medialis (femoral n.) & rectus femoris (femoral n.)
Approach:
- Incision from anteromedial thigh to medial patella
- Develop plane between vastus medialis and rectus femoris
- Split vastus intermedius deep
- Need to repair any detatched vastus medialis from quadriceps tendon insertion to patella
Dangers:
- Medial geniculate artery (ligate)

Medial Approach to Distal Femur
Interval:
- Superficial: Adductor Longus (Obturator n.) & Sartorius (Femoral N.)
- Deep: Adductor Longus (Obturator n.)& Vastus Medialis (Femoral N.)
Approach:
- Incision over adductor tubercle and extend proximally
- Develop plane between adductor longus and sartorisu, then deep vastus medialis.
- Cannot go distal to vastoadductor membrane (9cm proximal to jont. This is the membrane that covers hunters canal deep to sartorius.
Dangers:
- Saphenous n. (identify over adductor tendon)
- Femoral A. (crosses ant to post 13cm bove joint)

Smith-Peterson (Anterior) Approach to the Hip
Interval: *only approach to the hip with TRUE internervous plane
- Superificial: TFL (Superior Gluteal N.) & Sartorius (Femoral N.)
- Deep: Rectus Femoris (Femoral N.) & Gluteus Medius (Superior Gluteal N.)
Approach:
- Incision vertically from ASIS towards lateral side of patella (8-10 cm)
- Incise TFL fascia, retract muscle laterally, and incise deep subfascia to protect LFCN.
- Bluntly develop plate between Rectus & Gluteus medius. Take care to identify and ligate/cauterize branches of lateral femoral circumflex a. in this interval.
- Can detatch reflected head of rectus from acetabulum to better expose capsule
- Come directly ontop of hip capsule and make capsulotomy
Dangers:
- Lateral Femoral Cutaneous N. (branches over sartorius 2.5cm below ASIS)
- Ascending branches of Lateral Femoral Circumflex A.

Hardinge (Lateral) Approach to the Hip
Interval: Splitting Gluteus Medius (lateral to innervation by Superior Gluteal N.), and Splitting Rectus Femoris (Latearl to its innervation by Femoral N.)
Approach:
- Vertical incision centered over lateral aspect of greater trochanter.
- Incisise IT Band
- Split Gluteus Medius (2/3, 1/3 or 50/50)
- Split Gluteus Minimus and Capsule
- Peel Capsule, Gluteus Medius and Minimus anteriorly
- Dislocate hip ANTERIOR
Dangers:
- Superior Gluteal N.
- Branches 2-3 cm proximal to GT, dont split too high
- Femoral A., V. & N. - be careful with retractor positioning anteriorly

Watson-Jones (Anteriomedial) Approach to the Hip
Interval: Gluteus Medius (Superior Gluteal N.) & TFL (Superior Gluteal N.)
Approach:
- Vertical incision on the lateral aspect of the GT curving the proximal aspect
- Incise the lateral boarder of the TFL and retract anteriorly, revealling digastic tendon (glut med & vastus lateralis at the greater trochanter)
- Develop plane between gluteus medius and TFL
- Can release vastus lateralis anteriorly
Dangers: Femoral A., V. & N. (can be injured by excessive retraction/placement of anterior retractors)

Posterior (Moore-Southern) Approach to the Hip
Interval: No true IN plane, split ITB (Sup Gluteal N.) & Glut Maximus (Inf Gluteal N.)
Approach:
- Incision 10-15 centered on the posterior aspect of greater trochanter. Curved posterior proximally
- Split ITB and Gluteus Maximus
- Detatch piriformis and short external rotators, reflecting posteirorly to protect Sciatic N.
- Internal rotation of leg will stretch short external rotators and bring them away from Sciatic N.
- From this approach, Sciatic N. is deep to piriformis and superficial to short external rotators.
- This exposes capsule for capsulotomy
Dangers:
- Sciatic N. (reflect SERs to protect)
- Inferior Gluteal A. - ligate branches when splitting gluteus maximus
- Ascending branches of medial femoral circumflex - runs along proximal boarder of quadratus femoris (may detatch proximal 1cm, but preserve otherwise)

Ludloff (Medial) Approach to the Hip
Interval:
- Superficial: Adductor Longus (Obturator N.) & Gracilis (Obturator N.)
- Deep: Adductor Brevis (Obturator N.) & Adductor Magnus (Obturator N. & Tibial Fibres of Sciatic N.)
Approach:
- Incision 3cm below pubic tubercle
- No real Internervous Plane
- Dissect superficially between adductor longus and gracilis.
- Develop deep plane between adductor brevis and adductor magnus.
Dangers:
- Anterior Division of Obturator N. (between longus and brevis)
- Posterior Division of Obturator N. (on magnus under brevis)
- Medial Femoral Circumflex A. on distal psoas

Ilioinguinal Approach (Windows, Boarders, Approach & Dangers)
Exposure: Anterior Column and Quadrilateral Plate
Superficial Appraoch:
- Incision 5cm above ASIS to 2cm proximal to pubic tubercle
- Expose internal illiac fossa to the ASIS
- Release external oblique insertion onto illiac crest
- Expose internal illiac fossa subperiostially by mobilizing illiacus
- Incise extrernal oblique aponeurosis from ASIS to lateral boarder of rectus sheath, cranial to inguinal ring
- Release the muscular attachment from the inguinal ligament
- Mobilize spermatic cord/round ligament medially (and ilioinguinal nerve running with it)
- Incise conjoint tendon of transversus abdominus and internal oblique (inguinal ligament)
- Care taken to look for and protect LFCN found 2cm medial to ASIS
- Develop illiopecitneal fascia by retracting the femoral vessels, divide under direct visualization
Windows & Deep Approach:
-
Lateral Window: Illiac Wing to Psoas Tendon
- Continue subperiosteal dissection and elevation of illiacus from false pelvis
- Continue until SI joint/sufficient exposure reached
-
Middle Window: Psoas Tendon to Femoral Bundle
- Develop illiopectineal fascia by careful retraction of femoral vessels.
- Divide fascia under direct visualization
- Subperiosteally expose the quadrilateral plate/true pelvis
-
Medial Window: Epigastric Vessels/Spermatic Cord to Rectus Abdominus Insertion
- Release rectus insertion
- Retraction of the spermatic cord/round ligament
- Protect the bladder and develop space of Retzius with sponge
- Subperiosteal dissection of superior pubic ramus to symphasis
Dangers:
- Lateral Femoral Cutaneous N. (2cm medial to ASIS)
- Femoral N, A, V (in femoral sheath)
- Inferior Epigastric A (medial to inguinal ring, identify and ligate)
- Illioinguinal N. (runs with spermatic cord before entering peritoneum)
- Corona Mortis
- Spermatic Cord/Round Ligament
- Bladder

Modified Stoppa Approach (Exposure, Approach, Dangers)
Exposure:
- Quadrilateral Plate (direct instrumentation)
- Pubic Symphasis
- Entire Anterior Column when combined with lateral window of illioinguinal
Approach:
- Pfannenstiel incision above pubic symphasis
- Longitudinal incision of rectus fascia at linea alba
- Can partially detatch medial inerstion of rectus on the pubis to increase exposure
- Protect bladder and retract with malleable (use foley to deflate)
- Expose carefully along medial surface of superior ramus
- Look for and ligate corna mortise (~4cm medial to symphsis)
- Disect the iliopectineal arch from the pelvic brim allowing elevation of femoral vessels
- Can be limited by bifurcation of the illiac vessels
- Continue dissection to reveal quadrilateral plate. Will need to elevate obturator internus
- Obturator bundle crosses quadrilateral plate needs to mobilized and retracted
Dangers:
- Bladder
- Corona Mortise
- Obturator N. and Vessels
- External illiac Vessels Illiac Vessels

Kocher Langenbeck Approach (Exposure, Approach & Dangers)
Exposure: Posterior Column, Wall
Approach:
- Lateral Position
- Incision along posterior superior illiac spine to greater trochanter down shaft of femur
- Incise and split gluteus maximus & ITB
- posterior belly of glut max supplied by inferior gluteal a. and anterior belly supplied by superior gluteal a.
- Can detatch gluteus maximus 1cm from its insertion onto gluteal tuberosity of femur to increase exposure
- Brush aside fat over short external rotators
- Visulaize sciatic nerve tracing from quadratus femoris (most consistent location)
- Detatch piriformis and SERs, retract to protect Sciatic N.
- Retract up to sciatic notch and ischial spine to expose posterior wall and column
Dangers:
- Sciatic Nerve
- Superior Gluteal A & N - leaves pelvis above piriformis
- First perforating branch of Profunda Femoris (at risk with release of glut max insertion)
- Femoral Vessels (placement of retractors anterior to iliopsoas
- Inferior Gluteal A. - Leaves pelvis beneath piriformis
- Medial Circumflex A. (courses along superior edge of quadratus femoris)
- Heterotopic Ossification

Extended Iliofemoral Approach (Exposure, Approach & Dangers)
Exposure: Posterior column and entire lateral aspect of illiac wing (anterior and posterior)
- Can palpate quadrilateral plate
Approach:
- Incision: PSIS along illiac crest to ASIS then down towards lateral margin of knee
- Expose illiac crest Incise along crest and elevate subperiostially
- Elevate gluteals from posterior aspect of crest
- Elevate obliques and illiacus from anterior aspect of wing
- Take care to protect superior gluteal vessles and nerve emerging from greater sciatic notch
- Detatch fascia lata muscle from ASIS and develop between sartorius and TFL (smith peterson interval
- Retract posteriorly to expose direct and and reflected origins of rectus
- Direct head will lead to hip capsule
- Release gluteus minimus, retract posteriorly
- Release gluteus medius and retract posteriorly
- Release piriformis and SERs
- Can open capsule if desired.
Dangers:
- Sciatic N
- Lateral Femoral Cutaenous N.
- Superior Gluteal Vessels & Nerve
- Inferior Gluteal Vessels & Nerve
- Medial Femoral Circumflex (coursing along superior edge of quadratus femoris)
- Femoral Vessels with retractor placement anterior to iliopsoas
- Highest Risk of Heterotopic Ossification

Medial Parapatellar Approach to the Knee
Interval: No internervious. Intramuscular - VMO and rectus
Approach
- Incision longitudinally over patella
- Develop subcutanous fpals
- Marke out arthrotocmy, leaving a 3-5mm cuff
- Performe arthotomy
Dangers
- Articular Cartilage
- Medial Meniscus
Variations
- Subvastus - medial boarder of patella along VMO
- Midvastus - Divide VMO in line with fibres
- Quadriceps Snip - proximal incision along quadrieps tendon. Patella slid not everted

Anterolateral Approach to the Knee/ Proximal Tibia
Interval: ITB and Tib Ant and Tibial Crest
Approach:
- Incision: Gerdy’s tubercle, tibial crest and jointline. “hockeystick”
- Incise ITB if working anteriorly, or work between ITB and biceps.
- Perform submeniscal arthrotomy
Dangers:
- Peroneal Nerve - excessive posterolateral retraction
- Lateral Meniscus

Posterior Approach to the Knee
Interval: none, popliteal fossa
Approach:
- S-shaped incision acorss flexor crese.
- Dissect through fascia, idenfiity and prtect medial sural cutaneous nerve and short saphenous vein
- Retract head of gastrocs, protecte NVB
- Periosteially elevate soleus from proximal tibia
Dangers:
- Medial sural cuntaneous n.
- Popliteal A, Tibial N. Popliteal V.
- Short Saphenous V.
Medial Approach to the Knee
Interval: none
Approach:
- Curved incision from adductor tubercle
- Eleavate Skin Flaps
- Incise layeres anterior or posterior to MCL
- Anterior: through sartorial fascia, along baorder of sartorius- retract pes tendons posteriorly
- Posteriorly: retract sartorius, semi T & gracilis posteiroly then incise posterior to MCL
Dangers:
- Infrapatellar branch of saphenous n.
- Saphenous N & V (between gracilis and sartorius(
- Medial inferior geniculate A.
- Popliteal A - avoid going posteriorly

Anterior Approach to Tibia
Interval: none (anterior comaprtment)
Approach:
- Incision - paralel to and 1cm lateral to tibial crest
- Dissect through facia
- Exposre medial/lateral subcutaenous boarders subperiosteally
Dangers:
- Saphenous vein (subcutanous medially)

Anteriolateral Approach to Tibia
Interval:
- Superificial: perneus brevis (SPN) & EDL (Deep Peroneal N. )
- Deep- IOM & Extensors (Deep Peroneal N.)
Approach:
- Incision - over fibular shaft
- Develop between peroneus brevuis and EDL
- Lift EDL anteromedially
- Work over anterior fibula along IOM (beware of NVB)
Dangers:
- Small Saphenous V.
- Superficial peronean N. (Btw EDL & Peroneus Brevis)
- Anterior Compartment NVB (Deep peroneal n., ant tibial a & v.)

Posterolateral Approach to Tibia
Interval: Between posterior (Tibial N.) & Lateral compartments (SPN)
Approach:
- Incision: posterior aspect of fibula
- Develop between peroneals and lateral gastrocs
- Detatch soleus from fibula
- Find FHL, detatch from fibula and retract
- Get onto IOM (tib post muscle protects NVB)
- DIssect to expose tibia, lift subperosteally
Dangers:
- Short Saphenous Vein
- Peroneal A Branches- pass from post compartment to peroneals. Ligate as you go.
- Post Tib A, V
- Tibial N.

Proximal Approach to Fibula
Interval: Posterior compartment (tibial) and Peroneals (SPN).
Approach:
- Incision: proximally, follow bicesp femoris tendon, distally follow posterior tibia
- Find biceps femoris tendon, keep in mind the nerve is posterior to it.
- Incise fascia posteior to tendon
- Dissect out common peroneal n.
- Cut overlying peroneus longus muscle at fibular neck
- Subperiosteally elevate nerve off neck, and reflect anteriorly with penrose drain
- Detend distally, develop plane between soleus and peroneals
Dangers:
- Common Peroneal N.
- Peroneal A. - posterio to distal fibula - stay subperiosteal

Anterior Approach to Ankle
Interval: Internervous n/a. Choose deep interval.
Approach:
- Incision: longitudinal betwen medial and lateral malleolus
- Dissect NVB and protect
- Choose your interval (TA, EHL, EDB)
- Incise capsule inline with wound
Dangers:
- Superficial Peroneal N. - crosses anterior
- NVB - Ant Tib A., Deep Peroneal N.

Posteriomedial Approach to the Ankle
Interval: non- choose your interval (know your medial structures, Tom, Dick & V. Nervous Harry)
Approach:
- Incision: longitudinal between medial malleolus and achilles
- Incise deep fascia
- Find FHL (only fleshy muscle at this level)
- 4 Windows
- Lateral to FHL (FHL and peroneals)
- Medial to FHL (FHL & NVB)
- Cut all tedons (used for soft tissue releases)
- Medial to FHL (FDL and NVB)
Dangers:
- NVB - post tib A, V, tibial N.
- Saphenous N - runs infront of medial mallolus

Medial Approach to the Ankle
Interval: None (essentially between TA/TP)
Approach:
- Incision: longitudinal, curved over medial malleolus
- Incise down to bone and subperosteally elevate
Dangers:
- Saphenous N- runs over medial malleolus- stay subperiosteal
- Tib Post Tendon, just behind malleolus

Sinus Tarsi Approach to Ankle
Interval: Anterir to peroneal tendons (SPN), and EDB (Deep Peroneal N.)
Approach:
- Incision: overlying peroneal tendons,
- Mobilize flaps
- Reflect peroneals posteriorly
- Incise subtalar joint capsule
Dangers:
- Sural N.
- Short Saphenous V.

Extensile Lateral Approach to Calcaneus
Approach:
- Incision: L-shaped, just lateral to ahcilles to glaborous boarder and to the base of the 5th metatarsal
- At corners, cut straight to bone
- Use 15 balde to elevate full thickness flaps
- Put kwires in the talar head, cuboid and distal fibula and bend to hold up skin flap
- Be very careful with skin flap
Dangers:
- Sural nerve at proximal and distal end of incision
- Peroneal tendons as you’re elevating flap

Approach to Talar Neck (2 incisions)
Approach:
- Anteromedial
- Incision along talar neck
- Interval: TA (Deep Peroneal N.) & TP (Tibial N.)
- Incise, subcuatenous dissection onto capsule and neck
- Anterolateral
- Interval: peroneals (SPN) and EDB (deep peroneal n.)
- Incision: in line with 4th MT
- Incise, develop interval, retract EDB medially
- Incise capsule
Dangers:
- Saphenosu V & N. (medially)
- SPN (laterally)

Posterolateral Approach to Distal Fibula/Tibia
Intervals: Peroneals (SPN) & FHL (Deep Peroneal N.)
Approach
- Incision between fibula and achilles
- Develop interval between peroneals and FHL (Fleshy)
- Dissect FHL off of tibia subperiosteally
Dangers:
- Sural N. - in anterior flap

Anteriolateral Approach to the Lumbar Spine (Retroperitoneal)
Exposure: L1-Sacurm
Approach:
- Incision: Posteiror half of 12th rib to lateral boarder of rectus
- Subcutaneous fat, external oblique aponeurosis
- Divide Ext Oblique, Int Oblique And Trasverse Abdominus
- Divide plane between retroperitoneum and psoas
- Retract peritoneal cavity, follow psoas to lumbar bodies
- Tie segmental lumbar arteries of aorta in field of dissection
- L4L5 - mobilize aorta to contralateral side
- L5S1 - work between bifurcation
Dangers:
- Sympathetic Chaoin - lateral aspect of vertebral bodies
- Segmental Arteries of Aorta.
- Ureter
- Superior Hypogastric Plexus (retrograde ejaculation(

Wiltse Paraspinal Approach to the Spine
Indication: Far lateral disc herniation
Approach:
- For far lateral disc herniation
- Intramuscular plane between multifidus and longissimus
- Incision 3mm from midline
Dangers:
- Dorsal root ganglion

Anterior Transperitoneal Approach to Lumbar Spine
Indications: L5S1 Fusion
Approach:
- Incision: Longitudinal Midline - xyphoid to symphasis
- Fat, then through linea alba
- Incise peritoneum, lif to avoid injury to deep viscera and bladder
- Retract viscera laterally, trendelenberg, pack abdomen
- Ligate sacral artery, identify disc space
- L5S1 lies below Aortic Bifurcation
Dangers:
- Superior hypogastric plexus
- Vessesl : Aorta, IVC, Middle Sacral A.
- Ureter
- Bladder
- Viscera

Anterior (Smith Robinson) Approach to the Cervical Spine
Exposure: C3-T1
Approach:
- Incision: vertical or transverse along SCM
- Subcutaneous fat, platysma
- Identify anterior boarder of SCM, retract laterally
- Identify and retract strap muscles medially (Sternohyoid, and sternothyroid)
- Identify carotid sheath and retract lateraly at pretrachial fascia
- Identify and split longus colli and ALL
- 3 Fascial Layers Encountered
- Deep Cervical Fascia
- Pretrachial Fascia
- Prevertebral Fascia
Dangers:
- Recurrent Laryngeal Nerves (right more vulnerable than left)
- Sympathetic Nerves - can have Horner’s Syndrome
- Carotid Sheath Contents (Carotid A, V, Vagus N.)
- Retropharyngeal Hematoma
- Trachea
- Esophagus
