GIT Flashcards
(19 cards)
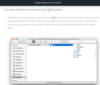
after running> git init
Use the git init command to create a new, empty repository in the current directory.
Running this command creates a hidden .git directory. This .git directory is the brain/storage center for the repository. It holds all of the configuration files and directories and is where all of the commits are stored.
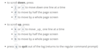
.git/config
config file - where all project specific configuration settings are stored.
From the Git Book:
Git looks for configuration values in the configuration file in the Git directory (.git/config) of whatever repository you’re currently using. These values are specific to that single repository.
For example, let’s say you set that the global configuration for Git uses your personal email address. If you want your work email to be used for a specific project rather than your personal email, that change would be added to this file.
.git/description
description file - this file is only used by the GitWeb program, so we can ignore it
.git/hooks
hooks directory - this is where we could place client-side or server-side scripts that we can use to hook into Git’s different lifecycle events
The “hooks” directory can be used to hook into different parts or events of Git’s workflow.
other than the “hooks” directory, you shouldn’t mess with pretty much any of the content in the .git directory
other stuff in .git directory
info directory - contains the global excludes file
objects directory - this directory will store all of the commits we make
refs directory - this directory holds pointers to commits (basically the “branches” and “tags”)
git clone
git clone
https://github.com/udacity/course-git-blog-project
or
If you want to clone the repository into a directory named something other than libgit2, you can specify the new directory name as an additional argument:
$ git clone https://github.com/libgit2/libgit2 mylibgit
navigate through log (vim)
to scroll down, press
j or ↓ to move down one line at a time
d to move by half the page screen
f to move by a whole page screen
to scroll up, press
k or ↑ to move _up_ one line at a time
u to move by half the page screen
b to move by a whole page screen
press q to quit out of the log (returns to the regular command prompt)
git log
By default, the git log command displays:
the SHA
the author
the date
and the message
…of every commit in the repository. I stress the “By default” part of what Git displays because the git log command can display a lot more information than just this.
shorter git log
git log –oneline
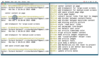
The git log command has a flag that can be used to display the files that have been changed in the commit, as well as the number of lines that have been added or deleted.
git log –stat
The git log command has a flag that can be used to display the actual changes made to a file.
git log -p
The flag is –patch which can be shortened to just -p
git log -w
git log -p -w will show the patch information, but will not highlight lines where only whitespace changes have occurred.
.gitconfig
.gitignore_global
…are located in the user’s home directory
git log
git log –oneline
git log –stat
git log -p
git log -p fdf5493
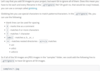
git show
git show fdf5493
…
By supplying a SHA, the git log -p command will start at that commit! No need to scroll through everything! Keep in mind that it will also show all of the commits that were made prior to the supplied SHA.
Running git show will only display the most recent commit. Typically, a SHA is provided as a final argument:
git show
by default, git show displays:
the commit
the author
the date
the commit message
the patch information
However, git show can be combined with most of the other flags we’ve looked at:
–stat - to show the how many files were changed and the number of lines that were added/removed
- p or –patch - this the default, but if –stat is used, the patch won’t display, so pass -p to add it again
- w - to ignore changes to whitespace
globbing
Globbing Crash Course
Let’s say that you add 50 images to your project, but want Git to ignore all of them. Does this mean you have to list each and every filename in the .gitignore file? Oh gosh no, that would be crazy! Instead, you can use a concept called globbing.
Globbing lets you use special characters to match patterns/characters. In the .gitignore file, you can use the following:
blank lines can be used for spacing
- marks line as a comment
* - matches 0 or more characters
? - matches 1 character
[abc] - matches a, b, _or_ c
** - matches nested directories - a/**/z matches
a/z
a/b/z
a/b/c/z
So if all of the 50 images are JPEG images in the “samples” folder, we could add the following line to .gitignore to have Git ignore all 50 images.
samples/*.jpg
.gitignore
To recap, the .gitignore file is used to tell Git about the files that Git should not track. This file should be placed in the same directory that the .git directory is in.
set tag: git tag -a
verify tags: git tag //lists all tags for the repo
delete tag: $ git tag -d v1.0
tag specific commit: $ git tag -a v1.0 a87984
an annotation on a commit to help with identifications: versions, beta etc stages, etc
$ git tag -a v1.0
CAREFUL: In the command above (git tag -a v1.0) the -a flag is used. This flag tells Git to create an annotated flag. If you don’t provide the flag (i.e. git tag v1.0) then it’ll create what’s called a lightweight tag.
Annotated tags are recommended because they include a lot of extra information such as:
the person who made the tag
the date the tag was made
a message for the tag
Because of this, you should always use annotated tags.
viewable in git log at end:
commit 6fa5f34790808d9f4dccd0fa8fdbc40760102d6e (HEAD -> master, tag: v1.0)
See how it says tag: v1.0? That’s the tag! Remember that tags are associated with a specific commit. This is why the tag is on the same line as the commit’s SHA.
